You are here: 1. Distribution System > 1.10. MAINTENANCE Menu: System Maintenance > 1.10.13. Maintenance - Item Maintenance > 1.10.13.3. Maintenance - Item Maintenance - Bin Location Maintenance > Bin Location Maintenance - Change Bin Locations > Maintaining Bin Change Lines > Change Bin Locations - Edit - Upload Line Records (v2.8)
Change Bin Locations - Edit - Upload Line Records (v2.8)

Use this option to load item lines into a bin change batch from either:

You can also use this option for manual data entry where you want to quickly key in the item then the quantity.


Technical Tip

To access this option, the registration code for Simple Hand Held must be turned on in your company configuration (see "Edit Company - Registration"). In addition, your Registry must be set to allow access to the new Upload options in Micronet. If not, you can load items into a bin change batch by referring to "Change Bin Locations - Edit - Load from Hand Held".

To upload item lines into a bin change batch:

  1. Display the Change Bin Locations screen for the bin change batch.

Refer to "Creating a New Bin Change Batch" or "Recalling a Bin Change Batch".

  1. Select EDIT | UPLOAD LINE RECORDS.

Micronet displays the Choose Upload Method screen.

  1. Complete the following fields:


Field

Value


Filename

If you are loading item lines from a file, select the Browse button to find the file containing the items you want to load. The item lines in this file must be in the format specified in the Format field below.


Format

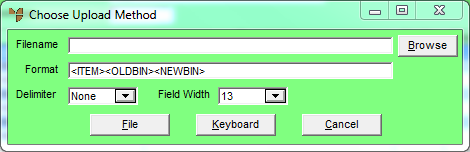
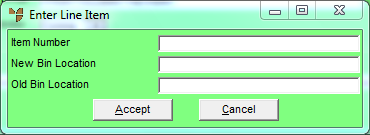
Micronet displays the default format for files to be uploaded. This format also defines the fields displayed during keyboard entry (only mandatory fields are displayed).

You can change the format to suit the file you are uploading if required, so there is a format entry for each column in the file. Micronet saves your format changes for the next time you upload item lines into a bin change batch.

The format you specify must comply with the following rules:

  • <ITEM> – This is the item number. It must be the first upload field and it is mandatory.
  • <OLDBIN> – This is the old bin location. It must be the second upload field and it is mandatory.
  • <NEWBIN> – This is the new bin location. It must be the third upload field and it is mandatory.

If your file contains additional fields to those specified in the format, you can enter <SKIP> to make Micronet ignore those fields. For example, <ITEM><OLDBIN><SKIP><NEWBIN>would ignore data in the column between the old bin location and the new bin location.


Delimiter

Select the method of separation between the fields in the file to be uploaded. Options are Comma, Space, Tab, Pipe ( | ), Colon (:) or None.


Field Width

This field is displayed if you selected None in the Delimiter field. If each field in the file is of a fixed length, select the length – either 13 or 50 characters.


Technical Tip

Micronet ignores any lines in the upload file that start with a forward slash ( / ). You can use this to exclude certain lines from being uploaded or to force Micronet to start uploading at a particular line in the file (e.g. to ignore records that have already been uploaded).

If your file contains special characters that form part of the data you want uploaded (such as forward slashes, commas or double quote marks), you need to place these characters and related text in double quotes. For example, to upload the text /itemno, you would need to change this to "/itemno". There may be a setting in the originating program that turns these characters on or off.

  1. Choose one of the methods below to enter the item lines.


Uploading from a File

If you selected a file in the Filename field on the Choose Upload Method screen:

  1. Select the File button.

Micronet uploads the item lines from the file into the bin change batch, with a progress bar showing the percentage completed. If Micronet encounters any invalid data, such as an incorrect or unknown item number, it displays the Item Selection screen where you can select the correct item. If other item data is missing, Micronet also displays any other screens that would be displayed during the bin change program for entry of the required details such as old and new bin numbers.

When Micronet has finished uploading all the item lines in the file, it redisplays the Change Bin Locations screen showing the uploaded item lines.

  1. Continue processing the bin change batch by following the appropriate procedures:


Keyboard Entry

If you want to manually enter the item lines:

  1. Select the Keyboard button on the Choose Upload Method screen.

Micronet displays the Enter Line Item screen.

  1. Complete the following fields:


Field

Value


Item Number

Enter the ID of the item you want to add to the bin change batch. You must know the item number.


New Bin Location

Enter the new bin location for the item.


Old Bin Location

Enter the old bin location for the item.

  1. Select the Accept button.

Micronet redisplays the Enter Line Item screen so you can enter further item lines.

  1. When you have finished adding item lines, select the Cancel button.

Micronet redisplays the Change Bin Locations screen with the item lines you added.

  1. Continue processing the bin change batch by following the appropriate procedures: